In this post I’ll show you a couple of parts of the Ansible roles I created to create the Amazon AWS infrastructure components as well as the deployment process.
Before we start, just a quick disclaimer: this implementation is 100% opinionated. Sure, you could implement it differently: this is how I did it.
Both roles are created using the command ansible-galaxy init <role>
hugo-aws-infra
( source: https://github.com/paprins/hugo-aws-infra )
Amazon Certificate Manager (ACM)
I used this command to request the TLS/SSL certificate:
aws acm request-certificate \
  --domain-name {{ s3_website_domain }} \
  --subject-alternative-names *.{{ s3_website_domain }} \
  --region {{ cloudfront_region }} \
  --idempotency-token \"{{ ansible_date_time.epoch }}\"
Notice that I used a wildcard for the --subject-alternative-names and not for the --domain-name. This way, the certificate is valid for both https://foobar-it.com and https://www.foobar-it.com. If you only request it for --domain-name *.foobar-it.com, you’ll create a wildcard certificate which is not valid for https://foobar-it.com.
Also, when requesting a certificate for use with CloudFront, you must specify --region us-east-1. Otherwise, it won’t work. This role is already configured to use that region.
Amazon CloudFront
As mentioned before, I like things to be idempotent. This means that when I already created the CloudFront Distribution, I don’t want the playbook to fail when I run it again. Ansible should either check if the Distribution already exists or simply not fail. In this implementation I chose for the latter:
- name: Hugo | Create Cloudfront Distribution
  command: "aws cloudfront create-distribution --distribution-config '{{ s3_website_cloudfront_distribution | to_json }}'"
  register: cloudfront_response
  failed_when: cloudfront_response.rc != 0 and 'CNAMEAlreadyExists' not in cloudfront_response.stderr
Notice the failed_when attribute: this takes care of the idempotency in case the Distribution has been created earlier. You could use this construct in other situations as well: mainly in situations where you have to revert to the command or shell modules.
Speed, speed, speed, …
Creating or updating a CloudFront distribution is not fast. In fact, it’s super slow: a simple change will take at least 15 minutes to be applied. If you know how CloudFront applies those changes, it makes sense. It has to update all relevant Edge Locations. Which Edge Locations it uses depend on the PriceClass you chose when creating the Distribution. Here’s a map that show all Edge Locations.
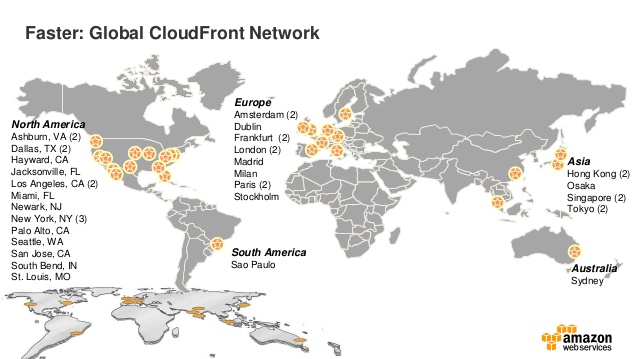
You can choose from:
PriceClass_All: Use all Edge Locations (which is the default)PriceClass_200: Use all Edge Locations in US, Europe, Hong Kong, Singapore and JapanPriceClass_100: Use Edge Locations in US and Europe only.
For your website, you should choose the PriceClass that suits your needs. If you truly want WORLD DOMINATION, opt for PriceClass_All. If your ambitions are slightly less, opt for PriceClass_100. This Ansible role uses PriceClass_100. Since this one got the least amount of Edge Locations, it will be the fastest when creating or updating CloudFront Distributions.
Please note that whatever PriceClass you choose, your website will be accessible from anywhere in the world (~ maybe except for North Korea and China). In the end, it’s all about decreasing latency.
Amazon Route53
Long story short: this role creates ALIAS records for both foobar-it.com and www.foobar-it.com. Make sure that both records are configured as alternate domain names for your distribution.
hugo-s3-deploy
( source: https://github.com/paprins/hugo-s3-deploy )
This role depends on the Amazon AWS resources we created earlier.
Since I specified the hugo_base_path as a relative path, I translated it to an absolute path.
- role: hugo-s3-deploy
  hugo_base_path: ../www
  s3_website_domain: "{{ website_domain }}"
  verbose: "{{ verbose_output }}"
  tags: deploy
… using the following construct:
- set_fact:
    hugo_work_dir: "{{ lookup('pipe', 'cd {{ hugo_base_path }}; pwd') }}"
    hugo_base_url: "{{ s3_website_domain.startswith('www.') | ternary(s3_website_domain,'www.' + s3_website_domain) }}"
Looks a bit weird, I admit, but it works flawlessly …
Next, I generate all static resources like this:
hugo --ignoreCache \
  --baseURL https://{{ hugo_base_url }}
  -s {{ hugo_work_dir }}
… then I upload all the things using this command:
aws s3 sync --acl 'public-read' \
  --sse 'AES256' \
  --delete {{ hugo_work_dir }}/public s3://{{ s3_website_bucket_name }} \
  --region {{ s3_website_region }}
Final words
In this post I explained, in a bit more detail, how I implemented my website. Have a look at the implementation yourself. If you have any questions, leave a comment.
Also, this implementation requires, ansible, aws-cli and hugo for the deployment process. This might be a unacceptable requirement if you want to automate the deployment process using Jenkins (or any other CI/CD tool). In an upcoming post, I’ll describe my setup which uses a Dockerized version of hugo to generate the website.